Showing posts with label baking photography. Show all posts

Wednesday, February 9, 2011

Peanut Butter Cup Cheesecake


First things first... IF YOU ARE PLANNING ON MAKING THIS CHEESECAKE AND SERVING IT TONIGHT YOU CAN'T!!!! Cheesecake has to set in the fridge overnight.

As you know I'm on a diet so I have been searching for a good excuse to make something delicious to share! A few weeks ago was my friend Taylor's Birthday and I jumped at the chance to make him a birthday dessert. He asked for "cheese cake or pumpkin pie is good stuff or peanut butter cake." So... a peanut butter cup cheese cake seemed perfect! I found this fabulous recipe on www.tasteofhome.com.

Tools Needed:
The Usual
Whisk
Baking sheet
Springform pan
Cooking spray
Microwave


Ingredients:
1 1/4 Cups graham cracker crumbs
1/4 Cup sugar
1/4 Cup crushed Oreo cookies
6 Tablespoons butter, melted
3/4 Cup creamy peanut butter
Filling:
3 Packages (8 ounces) cream cheese, softenend
1 Cup sugar
1 Cup (8 ounces) sour cream
1 1/2 Teaspoons vanilla extract (Bet you wish you had those odd size measuring spoons!)
3 Eggs, lightly beaten
1 Cup hot fudge ice cream topping
6 Peanut butter cups

Yields:
12 - 14 servings

In a large bowl, combine the graham cracker crumbs, sugar, cookie crumbs and butter. Press in to the bottom and 1 inch up the sides of a greased 9-in. springform pan. Place on a baking sheet. Bake at 350° for 7-9 minutes or until set. Let Cool.


In a microwave-safe bowl, heat peanut butter on high for 30 seconds or until softened. Spread over crust to within 1 inch of edges.


In a large bowl, beat cream cheese and sugar until smooth. Beat in sour cream and vanilla. Add eggs; beat on low speed just until combined. Pour 1 cup into a bowl; set aside. Pour remaining filling over peanut butter layer. In a microwave, heat 1/4 cup fudge topping on high for 30 seconds or until thin; fold into reserved cream cheese mixture. Carefully pour over filling. Swirl toppings... hopefully you can do a better job than I did. 


Return pan to baking sheet. Bake at 350° for 55-65 minutes or until center is almost set. Sometimes it is difficult to tell if your cheesecake is set... click here to see a few tips on how to tell if your cheesecake is set. Cool on a wire rack for 10 minutes. Carefully run a knife around edge of pan to loosen; cool 1 hour longer. Microwave remaining fudge topping for 30 seconds or until warmed; spread over cheesecake. Chop peanut butter cups into 4ths and garnish the cheesecake. Refrigerate overnight and refrigerate leftovers.


Look at that crust! Nom Nom Nom! Enjoy!

Monday, January 24, 2011

Uncommon Goods!

Whoops! Please forgive my absence! The holidays and my new workout/diet regimen have thrown me off and I'm working hard to get back on schedule!

Well... due to the diet I'm cutting back on baking (Sad I know but no worries! Very soon I'll be posting a peanut butter cup cheesecake recipe I'm making for a friends Bday) and eating high calorie foods. So this post is going to be about the AWESOME baking items I got for Christmas from Uncommongoods.com.

Pictured here are my soup and sandwich duo with crock pot tomato soup (recipe from crockpot365.blogspot.com ) and ham, parmesan mayo and grilled cheddar cheese sandwich. Yea... this was BEFORE I started the diet. Seriously in love with this item... can't stop using it!

Item #1 - Soup and Sandwich Tray Duo
I fell in love with this item the second I laid my eyes on it!!! My man and I are BIG soup and sandwich fans (especially during the winter months) so this item was so perfect. The dishes are porcelain, well made, solid and such a fun and simple design. The duo (i got two sets!) is sold as a set of two trays and two bowls which are oven, microwave and dishwasher safe. I thought that they were a little pricey but these things are going to last me for ages and I will use them to death!

Item #2 - Odd Size Measuring Spoons
How often do you run into a recipe that calls for the measurement of 1 1/2 tsp and you think to yourself... "Damn it! Now I have to get two measuring spoons dirty!"?  Not any more! These uncommon measuring spoons come in the following sizes... "pinch", 1/8 tsp, 1/4 tsp, 1/2 tsp, 2/3 tsp, 1 tsp, 1 1/2 tsp, 2 tsp and 1 tbsp. A normal set of measuring spoons come in sizes 1/8 tsp, 1/4 tsp, 1/2 tsp, 1 tsp and 1 tablespoon. Ridiculously helpful! I FREAKEN LOVE THEM!!!

Item #3 - Spaghetti Measure
I never fail at under measuring the amount of spaghetti I need to boil. This little doohickey has already saved me from under boiling enough spaghetti several times. The spaghetti measure allows you to decide how much pasta to make for one person or up to four. I do feel like the 4th setting makes more pasta then four people eat.

What have you bought from Uncommongoods.com? Did you get some unique kitchen items for Christmas?

Sunday, November 14, 2010

Caramel Apples


It is definitely the caramel apple time of the year! Sigh... Fall how I love everything about you! You bring cooler weather, the best TV shows, Halloween, changing of the leaves, Thanksgiving, warm comfort food and of course football (BOOMER SOONER!!). These caramel apples were delicious and I hope you enjoy them too!

Tools Needed:
Craft sticks or popsicle sticks ( You can find craft sticks in your grocery store and popsicle sticks at Hobby Lobby, Michael's or (probably) a specialty food store)
Bowls for candy coating
Towel
Ladle
Spatula
Muffin paper cups

Ingredients:
12 - 15 Small apples (I used Granny Smiths because they are my favorite)
2 (14 ounce) package individually wrapped caramels
Toppings

Firsts things first... when you are buying apples no matter where they are from (orchard, organic or chain grocery) they will have wax on them. Apples naturally create their own wax to protect its high water content. You MUST remove this wax in order to get the caramel to stick to the apples.


To remove the wax from the apples dip them into boiling water using a ladle. Make sure to submerge the entire apple in the boiling water. Don't leave the apple in the water long (no more than 10 - 15 seconds).


Remove the apple from the boiling water and wipe off the wax immediately using a towel. You should be able to see the wax coming off. 


Remove the stem from each apple and press a craft stick into the top.


There are several ways to melt caramel. Check out this link and select the method you prefer. Roll each apple quickly in melted caramel sauce until well coated. A spatula might come in hand to spread out the caramel on the apple. Immediately dip and roll the apples in your toppings. I used peanuts and mini chocolate chips (Delicious!). Place the finished caramel apples in a muffin paper cup (because they look cute and keep your pans from getting sticky with caramel!).


There are so many topping choices: Nuts, Sprinkles, Toffee bits, Chocolate chips, Candy corn, Dried fruit, M&M's, chopped candy bars like Snickers, Butterfinger or Baby Ruth, Crushed Oreos or graham crackers, Granola, Trail mix and Kosher salt! What were the toppings on your favorite caramel apple?

Monday, October 25, 2010

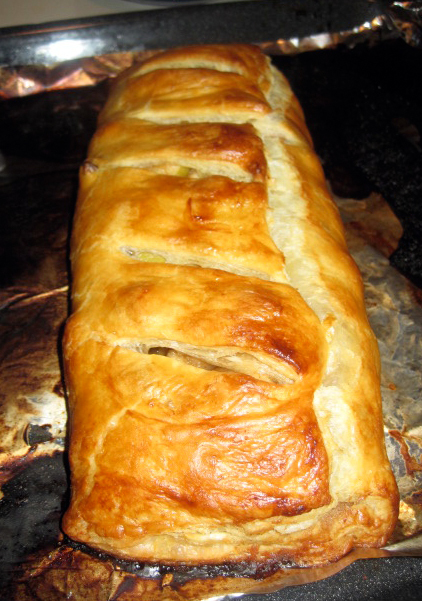
Easy Apple Strudel!

My friend Nick at Home Brew Brewery loves to brew his own beer.  In celebration of Oktoberfest he brewed a special batch and threw a party! I brought some delicious (and super easy) Apple Strudel. I started with this recipe from All Recipes. Because the recipe only called for brown sugar to be mixed with the apples... I spiced it up a bit!

Ingredients:
2 - 3 Granny Smith apples
1 Cup brown sugar
1 1/2 Tablespoons cinnamon
2 1/4 Teaspoons nutmeg
1/4 Teaspoon cayenne pepper
1 Sheet frozen puff pastry, thawed
1 Egg
1/4 Cup milk

Tools Needed:
The Usual
Whisk
Baking Sheet
Baking Brush
Foil

Preheat oven to 400 degrees. Line a baking sheet with aluminum foil. Peel, core and slice up the apples and place them in a large bowl. I did what I like to call the "homemade peel" ...aka the lazy persons peel. I love the taste of apple peels and it's the healthiest part so I don't really see a reason to peel off all of the apple peel.


Stir the brown sugar, cinnamon, nutmeg and cayenne pepper into the apples.


 Place puff pastry flat on the baking sheet and arrange apple filling down the middle of the pastry lengthwise. You may not be able to fit all of the apple filling into the pastry. 


Fold the pastry lengthwise around the mixture. Seal edges of pastry by using a bit of water on your fingers, and rubbing the pastry edges together. Whisk egg and milk together, and brush onto top of pastry. Cut several slits into the pastry.


Bake in oven for 20 to 25 minutes, or until golden brown.


Here is a slice of the strudel with some of Nicks Oktoberfest home brew. I got a million compliments on the strudel at Nicks party. It is super easy and you will definitely enjoy it!

Thursday, September 9, 2010

Chocolate Eclair Cake

My man (Chris) had his 26th Birthday this week so I made him his favorite dessert, Chocolate Eclair Cake! Chris's mother gave me this recipe. It is super easy and tastes fantastic!


Tools Needed:
The usual
9 x 13 Pan
Handheld or stand mixer

Ingredients:
1 (16 ounce) Package graham crackers
2 (3.5 ounce) Packages instant vanilla pudding mix
3 Cups milk
1 (8 ounce) Package frozen Cool Whip, thawed
1 (8 ounce) Container of sour cream
1 Container or prepared chocolate frosting


 Mix the pudding with 3 cups of milk according to the directions on the box. 


Line the bottom of your 9 x 13 inch pan with graham crackers.


Blend Cool Whip and sour cream into the pudding. 


Spread half of the pudding mixture over the graham crackers, then top with graham crackers. Spread remaining pudding over graham crackers; top second pudding layer with another layer of crackers. 


Microwave the container of prepared chocolate frosting, uncovered in the microwave for 1 minute on half power. Pour over the top of the cake and spread out. Refrigerate for 4 hours or freeze for 2. The longer the eclair has to set in the cold the better. 


Cut and enjoy! 
Happy Birthday Chris!

Thursday, August 19, 2010

Crookies!

I have been crazy busy this week trying to get ready for a Thanksgiving in Summer party I'm having this weekend! Next weeks blog post will be all about the Thanksgiving feast so get excited!!

I decided to make a dessert I tried a few weeks ago while in Odessa, TX for a family reunion. Crookies... tastes similar to a Twix bar and will probably be the easiest dessert you every made.

Tools Needed:
Baking pan
Spatula

Ingredients:
Crackers (I used Club Crackers but almost any kind of crackers will work. The recipe suggests saltines!)
Package of chocolate chips ( I used semi-sweet because I ♡ dark chocolate but most people would prefer milk chocolate)
1 Cup brown sugar
1 Stick of butter
Pam

Spay your cookie sheet with Pam. Spread one sleeve of crackers on to the baking sheet


 Melt on medium low one stick of butter and one cup of brown sugar. Pour evenly over crackers. Bake for 5 minutes at 350 degrees. Will be bubbly!


 Sprinkle one bag of chocolate chips over the crackers. The chocolate chips will melt fast so be ready to spread them out with your spatula.


 Pop your baking sheet into the fridge or freezer. Once the Crookies are set break them apart and... Enjoy!

Extra little tid bit for all those bloggers out there... I changed my Blogger icon from the standard B to a cute little cupcake. You can do the same sort of thing for your blog! Read this how to article.

Tuesday, August 3, 2010

Birthday Cupcake Pops!

Going along with the theme from last weeks Birthday post I decided to do yet another Birthday beauty with cupcake pops! I have been wanting to make birthday pops ever since I discovered them on Bakerella. Bakeralla of course does a much prettier and cleaner job then I did but my cupcake pops turned out delicious and I am so proud!

The recipe I used is from from Martha Stewart and it is as follows:

Tools Needed:
The usual
Baking sheet
Parchment paper or foil
Lollipop sticks ( I could not find lollipop sticks in my grocery store so I used some craft sticks and that worked very well. You can find lollipop sticks at Hobby Lobby, Michael's or (probably) a specialty food store).
Double boiler, crock pot or microwave
Food Processor
Mini flower-shaped cookie cutter
Styrofoam square (found these puppies in the craft and the flower arrangements aisle at Wally World)

Ingredients:
9-by-13 Inch - Chocolate cake (You can use whatever flavor cake you want... I read a recipe which used red velvet cake and it looked wonderfully delicious!)
2 Cups - Cream Cheese Frosting (Again any flavor and conveniently one regular size icing container equals 2 cups!)
1 Package - chocolate coating bark
1 Package - white coating bark or candy melts (white coating bark can be found at your grocery store but you will have to venture to Hobby Lobby, Michael's or (probably) a specialty food store to get the candy melts).
Sprinkles - for garnish
Candy-coated chocolates - such as M and M's or Reese's Pieces, for garnish


Line a baking sheet with parchment paper or foil and set aside. Trim about 1/2 inch from the perimeter of the cake. Working in batches, crumble cake into the bowl of a food processor; process until fine crumbs form.


Add the frosting and blend together until well combined. Roll mixture into 1 1/2-inch balls (I personal think you can do whatever size you want... within reason. Obviously a baseball size cupcake pop will not stay on the stick)! Transfer cupcake balls to a prepared baking sheet. Transfer to refrigerator until chilled, about 2 hours or to a freezer for about 10 minutes.


I felt like a video was needed here instead of just a photo. Since I am not the best at video recording and because there are several ways to form cupcake pops here is a link to a video of shaping cupcake pops. Begin to shape balls into cupcakes by rolling balls first into logs. Fit logs into a mini flower-shapedcookie cutter. Push cake mixture into the cutter halfway so that some of the cake mixture extends beyond the top of the cutter. Shape extended cake mixture into a cupcake-shaped top. Push cake from cutter to remove.


Transfer molded cupcakes to freezer until chilled, 5 to 10 minutes.


Meanwhile, melt chocolate... if you read last weeks post then you will remember there are several ways to melt chocolate. Here is the article on ways to melt chocolate... pick your favorite method! I went a new way this week and used the microwave because crock pots are slow and my double boiler is satan.


Remove cupcakes from freezer and dip the bottom of each cupcake into the chocolate; transfer, bottom-side up to back to baking sheet. You can place dipped cupcake pops on to the same baking sheet but it may be easier if you have two prepared baking sheets.

Insert lollipop sticks into dipped cupcake immediately after you dip them! If you allow the dipped cupcake pops to sit to long the sticks may crack the chocolate coating. Let chocolate set, 15 to 20 minuets.


Melt white chocolate or pink candy melts. Dip the tops of the cupcakes into the chocolate and place right-side up on prepared baking sheet or stick lollipop sticks into a styrofoam square. Place a candy-coated chocolate in the center of each and top with sprinkles. Let dry completely in refrigerator. And... Enjoy!

As always this baking blog was edited for fantasticalness by The Lady In Red (who promises to update her new blog with fantastic Movie, Book and TV Show thoughts, reviews and opinions!).

Monday, July 26, 2010

Oreo Cream Cheese Truffles

Last week was my Birthday week and I decided to make one of my favorite desserts... Oreo Cream Cheese Truffles. They are very rich and to die for! The recipe is as follows...


Tools Needed:
The usual (measuring utensils, mixing bowls etc.)
Double boiler, crock pot or microwave
Foil or wax paper
Baking sheet
Chocolate dipper tools

Ingredients:
1 package of Oreos (I used regular but I imagine double stuffed or mint would be very good)
1 8 ounce package of cream cheese
2 8 ounce packages semi-sweet baking chocolate

Melt packages of semi-sweet baking chocolate. I used a crock pot to melt the chocolate but that is only because I HATE double boilers and never fail to burn myself while using them. The downside to using a crock pot is that the truffles will not look as pretty. There are several ways to melt chocolate, I suggest reading this how to article and decide which method will work best for you.

Crush 36 Oreos into fine crumbs using a food processor (Oreos can also be finely crushed in a resealable plastic bag using a rolling pin). If you would like to top your truffles off with Oreo crumbs then crush 9 of them to fine crumbs in food processor; reserve for later use. Place crushed Oreos in a medium bowl. Add softened cream cheese and mix until well blended. 

Roll cookie mixture into 25 to 50 balls (depending on how big you want your truffles). Place balls on a baking sheet lined with foil or wax paper and put in the freezer for 10 to 20 min.

Using chocolate dipper tools dip balls in melted chocolate and place back on the wax or foiled baking sheet. If you do not have chocolate dipper tools a fork or small slotted spoon will also work. Sprinkle your truffles with reserved cookie crumbs.

Place your truffles in the freezer until firm, about 30 min. Store leftover truffles, covered, in refrigerator or freezer. Enjoy!


As always this baking blog was edited for deliciousness by The Lady in Red.

Sunday, July 18, 2010

Laura's Peach Pie

Chris (my man) and I joined Native Roots Market's Garden Club for the summer. Each Friday we receive a fresh basket of local fruits, vegetables, herbs, spices and recipes. Everything is wonderful!

Last week we received several beautiful peaches and Laura's Peach Pie recipe. The Peach Pie was absolutely fantastic! The recipe is as follows...

Filling Ingredients:
1 Graham cracker crust
1 lb Fresh peaches
5 Tablespoons of granulated sugar
1/2 Teaspoon ground cinnamon
Dash cayenne (don't skip this ingredient!!)
2 Tablespoons all purpose flour
1/4 Tablespoons fresh squeezed lemon juice
1/8 Teaspoon kosher salt

Filling Directions:

Peel, slice and core peaches.

Place sugar, cinnamon, cayenne, flour and salt in a bowl. Place peaches in the bowl. Mix with spatula until fruit is coated. Next add lemon juice and mix. Add filling mixture to graham cracker crust.

Topping Ingredients:
1/2 Cup chopped pecans
1/4 Cup granulated sugar
1/4 Cup brown sugar
1/2 Teaspoon cinnamon
6 Tablespoons all purpose flour
4 Tablespoons unsalted butter
1/4 Cup oats
1/8 Teaspoon kosher salt

Topping Directions:
Cut (** Don't know how to "Cut butter"? No worries... I didn't either! Check out this how to article) butter into flour, brown sugar and granulated sugar until butter is almond size. Add salt, oats, cinnamon and pecans. Mix until incorporated. 

Add on top of fruit. Make sure all fruit is completely covered and freeze pie overnight (you do not have to freeze pie overnight but, be sure to put it in the freezer for at least an hour).

Baking Instructions:
  1. Preheat oven to 375 degrees
  2. Place on baking sheet
  3. Bake for 45 min
  4. Let cool for 30 min and enjoy!!!
This pie was so good. I'm sorry I don't have a picture of a slice... it was all gone before I had the chance!!!

As always this baking blog was edited for deliciousness by The Lady in Red.

Friday, July 9, 2010

Yay New Blog!

I have FINALLY taken the time to start this blog! I'm attempting to expand my knowledge in the area's of baking, baking photography and anything else I might currently be enjoying. I ♥ to bake and am really excited to share the recipes I find with all of you! The majority of what I make will be cookies, candy and pie. I will not make much cake because I'm not really a cake eater. Not to say that I don't like cake... I would just rather eat something else like... cheese cake or ice cream or truffles!

So the blog design that I currently have is still in the works! I should have something much more appropriate for a baking blog soon. My designer is my friend Nick and you can see his amazing artistic abilities at www.nickrboltondesign.com.

Today's blog will be a dedication to two of the favorite things I have made in the past. Enjoy!


I have always been afraid to make Apple Pie... it just seemed so difficult until I found this website!

Everyone loves cupcakes! Don't waste your time mixing cupcake ingredients... they are just as good if not better from a box (I suggest Betty Crocker Super Moist but don't take my word for it! Read this article!). With cupcakes you should spend your time on frosting and decorations! I used these cake decorating tools from Pampered Chef to add the uhhh mazing icing!

As always (well... from this point forward anyway) this baking blog was edited for awesomeness by The Lady in Red.