Tuesday, March 1, 2011

The HangOver Kit!

Well readers this post is a little bit different from anything I have ever posted but I'm positive you will enjoy it (yea... I'm still on my diet)!

I'm famous (with my friends) for giving HangOver Kits. Everyone needs a HangOver Kit from time to time. I can't tell you how many times I have given this gift and the receivers almost never fail to call or text me the next day to profusely thank me and to describe in detail which items they used and why.

These kits are SO easy to make and are perfect for many occasions: Birthdays, Bachelor or Bachelorette Parties, Graduations, Rehearsal Dinners, Raffle prizes etc etc. I jump at every chance I get to make one!

For what I call a "Regular HangOver Kit" you will need...

1 Box of Saltine Crackers
3 to 4 Cans or small bottles of Sprite, 7up or Ginger Ale
1 bottle of Gatorade, Coconut milk, Powerade or Pedialyte
1 Bowl, soup at hand or pop top can of Cambells Chicken Noodle Soup
1 Bottle of Peptobismo
1 Bottle of ibuprofen
1 Pack of gum or mints
1 Trash sack or plastic grocery bag
1 Trash can or bucket

Many of these Items can be interchanged or added to. For example If this gift is for a Birthday I amp it up with a small (but nice) bottle of vodka and blood mary mix or a gift card to some greasy fast food place. Occasionally I have run into joint graduation parties and needed to make several HangOver kits. For this sort of occasion I suggest making a...


"Mini HangOver Kit" which includes...

1 Sleeve of Saltine Crackers
1 to 2 Cans or small bottles of Sprite, 7up or Ginger Ale
or
1 bottle of Gatorade, Coconut milk, Powerade or Pedialyte
1 Soup at hand or pop top can of Cambells Chicken Noodle Soup
1 box of Peptobismo
1 bottle of ibuprofen
1 pack of gum or mints
1 Trash sack or plastic grocery bag
1 Small basket, shower caddy, trash bag, bucket or trash can


Line your bucket or trash can with a plastic baggy (believe it or not I have actually had a friend use the bucket for... well you know). Organize your kit so that the receiver can see all of the items. If it is a big bucket or trash can I fill the bottom with multiple trash bags and the extra sodas. 


Finish off your kit with a "The HangOver Kit" note (you can download the pdf here). Cut and paste the note onto some weighted scrap booking paper. Enjoy!

Did I miss anything? What helps you get over a hangover?

Wednesday, February 9, 2011

Peanut Butter Cup Cheesecake


First things first... IF YOU ARE PLANNING ON MAKING THIS CHEESECAKE AND SERVING IT TONIGHT YOU CAN'T!!!! Cheesecake has to set in the fridge overnight.

As you know I'm on a diet so I have been searching for a good excuse to make something delicious to share! A few weeks ago was my friend Taylor's Birthday and I jumped at the chance to make him a birthday dessert. He asked for "cheese cake or pumpkin pie is good stuff or peanut butter cake." So... a peanut butter cup cheese cake seemed perfect! I found this fabulous recipe on www.tasteofhome.com.

Tools Needed:
The Usual
Whisk
Baking sheet
Springform pan
Cooking spray
Microwave


Ingredients:
1 1/4 Cups graham cracker crumbs
1/4 Cup sugar
1/4 Cup crushed Oreo cookies
6 Tablespoons butter, melted
3/4 Cup creamy peanut butter
Filling:
3 Packages (8 ounces) cream cheese, softenend
1 Cup sugar
1 Cup (8 ounces) sour cream
1 1/2 Teaspoons vanilla extract (Bet you wish you had those odd size measuring spoons!)
3 Eggs, lightly beaten
1 Cup hot fudge ice cream topping
6 Peanut butter cups

Yields:
12 - 14 servings

In a large bowl, combine the graham cracker crumbs, sugar, cookie crumbs and butter. Press in to the bottom and 1 inch up the sides of a greased 9-in. springform pan. Place on a baking sheet. Bake at 350° for 7-9 minutes or until set. Let Cool.


In a microwave-safe bowl, heat peanut butter on high for 30 seconds or until softened. Spread over crust to within 1 inch of edges.


In a large bowl, beat cream cheese and sugar until smooth. Beat in sour cream and vanilla. Add eggs; beat on low speed just until combined. Pour 1 cup into a bowl; set aside. Pour remaining filling over peanut butter layer. In a microwave, heat 1/4 cup fudge topping on high for 30 seconds or until thin; fold into reserved cream cheese mixture. Carefully pour over filling. Swirl toppings... hopefully you can do a better job than I did. 


Return pan to baking sheet. Bake at 350° for 55-65 minutes or until center is almost set. Sometimes it is difficult to tell if your cheesecake is set... click here to see a few tips on how to tell if your cheesecake is set. Cool on a wire rack for 10 minutes. Carefully run a knife around edge of pan to loosen; cool 1 hour longer. Microwave remaining fudge topping for 30 seconds or until warmed; spread over cheesecake. Chop peanut butter cups into 4ths and garnish the cheesecake. Refrigerate overnight and refrigerate leftovers.


Look at that crust! Nom Nom Nom! Enjoy!

Monday, January 24, 2011

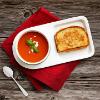
My Review of SOUP AND SANDWICH CERAMIC TRAY DUO

Originally submitted at UncommonGoods

Nestling cozily on its sandwich tray, this soup bowl helps you indulge your comfort food cravings. Perfectly sized to serve up tomato soup and a grilled cheese sandwich, this ceramic combo lets you end the precarious balancing act of enjoying your favorite quick and comfy meal. Safe for use in the ...


LOVE LOVE LOVE LOVE LOVE LOVE LOVE LOVE

By Jacquelynn from Oklahoma City, OK on 1/24/2011


5out of 5

Pros: Stylish, Attractive Design, High Quality, Dishwasher Safe, Doesn't Stain

Best Uses: Formal Occasions, Daily Use, Dinner partys

Describe Yourself: Frequent Entertainer, Bargain Hunter

I'm just looking for an excuse to use my set! I would buy this over and over and over again. I first thought it was a bit expensive but these are well made and will last me for ages!! Totally worth the money!

Love my soup and sandwich duo!

thumbnail

Tags: Picture of Product

(legalese)

Uncommon Goods!

Whoops! Please forgive my absence! The holidays and my new workout/diet regimen have thrown me off and I'm working hard to get back on schedule!

Well... due to the diet I'm cutting back on baking (Sad I know but no worries! Very soon I'll be posting a peanut butter cup cheesecake recipe I'm making for a friends Bday) and eating high calorie foods. So this post is going to be about the AWESOME baking items I got for Christmas from Uncommongoods.com.

Pictured here are my soup and sandwich duo with crock pot tomato soup (recipe from crockpot365.blogspot.com ) and ham, parmesan mayo and grilled cheddar cheese sandwich. Yea... this was BEFORE I started the diet. Seriously in love with this item... can't stop using it!

Item #1 - Soup and Sandwich Tray Duo
I fell in love with this item the second I laid my eyes on it!!! My man and I are BIG soup and sandwich fans (especially during the winter months) so this item was so perfect. The dishes are porcelain, well made, solid and such a fun and simple design. The duo (i got two sets!) is sold as a set of two trays and two bowls which are oven, microwave and dishwasher safe. I thought that they were a little pricey but these things are going to last me for ages and I will use them to death!

Item #2 - Odd Size Measuring Spoons
How often do you run into a recipe that calls for the measurement of 1 1/2 tsp and you think to yourself... "Damn it! Now I have to get two measuring spoons dirty!"?  Not any more! These uncommon measuring spoons come in the following sizes... "pinch", 1/8 tsp, 1/4 tsp, 1/2 tsp, 2/3 tsp, 1 tsp, 1 1/2 tsp, 2 tsp and 1 tbsp. A normal set of measuring spoons come in sizes 1/8 tsp, 1/4 tsp, 1/2 tsp, 1 tsp and 1 tablespoon. Ridiculously helpful! I FREAKEN LOVE THEM!!!

Item #3 - Spaghetti Measure
I never fail at under measuring the amount of spaghetti I need to boil. This little doohickey has already saved me from under boiling enough spaghetti several times. The spaghetti measure allows you to decide how much pasta to make for one person or up to four. I do feel like the 4th setting makes more pasta then four people eat.

What have you bought from Uncommongoods.com? Did you get some unique kitchen items for Christmas?