Tuesday, March 1, 2011

The HangOver Kit!

Well readers this post is a little bit different from anything I have ever posted but I'm positive you will enjoy it (yea... I'm still on my diet)!

I'm famous (with my friends) for giving HangOver Kits. Everyone needs a HangOver Kit from time to time. I can't tell you how many times I have given this gift and the receivers almost never fail to call or text me the next day to profusely thank me and to describe in detail which items they used and why.

These kits are SO easy to make and are perfect for many occasions: Birthdays, Bachelor or Bachelorette Parties, Graduations, Rehearsal Dinners, Raffle prizes etc etc. I jump at every chance I get to make one!

For what I call a "Regular HangOver Kit" you will need...

1 Box of Saltine Crackers
3 to 4 Cans or small bottles of Sprite, 7up or Ginger Ale
1 bottle of Gatorade, Coconut milk, Powerade or Pedialyte
1 Bowl, soup at hand or pop top can of Cambells Chicken Noodle Soup
1 Bottle of Peptobismo
1 Bottle of ibuprofen
1 Pack of gum or mints
1 Trash sack or plastic grocery bag
1 Trash can or bucket

Many of these Items can be interchanged or added to. For example If this gift is for a Birthday I amp it up with a small (but nice) bottle of vodka and blood mary mix or a gift card to some greasy fast food place. Occasionally I have run into joint graduation parties and needed to make several HangOver kits. For this sort of occasion I suggest making a...


"Mini HangOver Kit" which includes...

1 Sleeve of Saltine Crackers
1 to 2 Cans or small bottles of Sprite, 7up or Ginger Ale
or
1 bottle of Gatorade, Coconut milk, Powerade or Pedialyte
1 Soup at hand or pop top can of Cambells Chicken Noodle Soup
1 box of Peptobismo
1 bottle of ibuprofen
1 pack of gum or mints
1 Trash sack or plastic grocery bag
1 Small basket, shower caddy, trash bag, bucket or trash can


Line your bucket or trash can with a plastic baggy (believe it or not I have actually had a friend use the bucket for... well you know). Organize your kit so that the receiver can see all of the items. If it is a big bucket or trash can I fill the bottom with multiple trash bags and the extra sodas. 


Finish off your kit with a "The HangOver Kit" note (you can download the pdf here). Cut and paste the note onto some weighted scrap booking paper. Enjoy!

Did I miss anything? What helps you get over a hangover?

Wednesday, February 9, 2011

Peanut Butter Cup Cheesecake


First things first... IF YOU ARE PLANNING ON MAKING THIS CHEESECAKE AND SERVING IT TONIGHT YOU CAN'T!!!! Cheesecake has to set in the fridge overnight.

As you know I'm on a diet so I have been searching for a good excuse to make something delicious to share! A few weeks ago was my friend Taylor's Birthday and I jumped at the chance to make him a birthday dessert. He asked for "cheese cake or pumpkin pie is good stuff or peanut butter cake." So... a peanut butter cup cheese cake seemed perfect! I found this fabulous recipe on www.tasteofhome.com.

Tools Needed:
The Usual
Whisk
Baking sheet
Springform pan
Cooking spray
Microwave


Ingredients:
1 1/4 Cups graham cracker crumbs
1/4 Cup sugar
1/4 Cup crushed Oreo cookies
6 Tablespoons butter, melted
3/4 Cup creamy peanut butter
Filling:
3 Packages (8 ounces) cream cheese, softenend
1 Cup sugar
1 Cup (8 ounces) sour cream
1 1/2 Teaspoons vanilla extract (Bet you wish you had those odd size measuring spoons!)
3 Eggs, lightly beaten
1 Cup hot fudge ice cream topping
6 Peanut butter cups

Yields:
12 - 14 servings

In a large bowl, combine the graham cracker crumbs, sugar, cookie crumbs and butter. Press in to the bottom and 1 inch up the sides of a greased 9-in. springform pan. Place on a baking sheet. Bake at 350° for 7-9 minutes or until set. Let Cool.


In a microwave-safe bowl, heat peanut butter on high for 30 seconds or until softened. Spread over crust to within 1 inch of edges.


In a large bowl, beat cream cheese and sugar until smooth. Beat in sour cream and vanilla. Add eggs; beat on low speed just until combined. Pour 1 cup into a bowl; set aside. Pour remaining filling over peanut butter layer. In a microwave, heat 1/4 cup fudge topping on high for 30 seconds or until thin; fold into reserved cream cheese mixture. Carefully pour over filling. Swirl toppings... hopefully you can do a better job than I did. 


Return pan to baking sheet. Bake at 350° for 55-65 minutes or until center is almost set. Sometimes it is difficult to tell if your cheesecake is set... click here to see a few tips on how to tell if your cheesecake is set. Cool on a wire rack for 10 minutes. Carefully run a knife around edge of pan to loosen; cool 1 hour longer. Microwave remaining fudge topping for 30 seconds or until warmed; spread over cheesecake. Chop peanut butter cups into 4ths and garnish the cheesecake. Refrigerate overnight and refrigerate leftovers.


Look at that crust! Nom Nom Nom! Enjoy!

Monday, January 24, 2011

My Review of SOUP AND SANDWICH CERAMIC TRAY DUO

Originally submitted at UncommonGoods

Nestling cozily on its sandwich tray, this soup bowl helps you indulge your comfort food cravings. Perfectly sized to serve up tomato soup and a grilled cheese sandwich, this ceramic combo lets you end the precarious balancing act of enjoying your favorite quick and comfy meal. Safe for use in the ...


LOVE LOVE LOVE LOVE LOVE LOVE LOVE LOVE

By Jacquelynn from Oklahoma City, OK on 1/24/2011


5out of 5

Pros: Stylish, Attractive Design, High Quality, Dishwasher Safe, Doesn't Stain

Best Uses: Formal Occasions, Daily Use, Dinner partys

Describe Yourself: Frequent Entertainer, Bargain Hunter

I'm just looking for an excuse to use my set! I would buy this over and over and over again. I first thought it was a bit expensive but these are well made and will last me for ages!! Totally worth the money!

Love my soup and sandwich duo!

thumbnail

Tags: Picture of Product

(legalese)

Uncommon Goods!

Whoops! Please forgive my absence! The holidays and my new workout/diet regimen have thrown me off and I'm working hard to get back on schedule!

Well... due to the diet I'm cutting back on baking (Sad I know but no worries! Very soon I'll be posting a peanut butter cup cheesecake recipe I'm making for a friends Bday) and eating high calorie foods. So this post is going to be about the AWESOME baking items I got for Christmas from Uncommongoods.com.

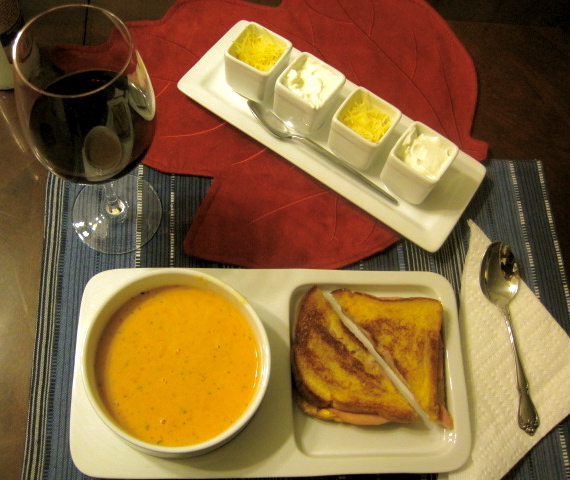
Pictured here are my soup and sandwich duo with crock pot tomato soup (recipe from crockpot365.blogspot.com ) and ham, parmesan mayo and grilled cheddar cheese sandwich. Yea... this was BEFORE I started the diet. Seriously in love with this item... can't stop using it!

Item #1 - Soup and Sandwich Tray Duo
I fell in love with this item the second I laid my eyes on it!!! My man and I are BIG soup and sandwich fans (especially during the winter months) so this item was so perfect. The dishes are porcelain, well made, solid and such a fun and simple design. The duo (i got two sets!) is sold as a set of two trays and two bowls which are oven, microwave and dishwasher safe. I thought that they were a little pricey but these things are going to last me for ages and I will use them to death!

Item #2 - Odd Size Measuring Spoons
How often do you run into a recipe that calls for the measurement of 1 1/2 tsp and you think to yourself... "Damn it! Now I have to get two measuring spoons dirty!"?  Not any more! These uncommon measuring spoons come in the following sizes... "pinch", 1/8 tsp, 1/4 tsp, 1/2 tsp, 2/3 tsp, 1 tsp, 1 1/2 tsp, 2 tsp and 1 tbsp. A normal set of measuring spoons come in sizes 1/8 tsp, 1/4 tsp, 1/2 tsp, 1 tsp and 1 tablespoon. Ridiculously helpful! I FREAKEN LOVE THEM!!!

Item #3 - Spaghetti Measure
I never fail at under measuring the amount of spaghetti I need to boil. This little doohickey has already saved me from under boiling enough spaghetti several times. The spaghetti measure allows you to decide how much pasta to make for one person or up to four. I do feel like the 4th setting makes more pasta then four people eat.

What have you bought from Uncommongoods.com? Did you get some unique kitchen items for Christmas?

Tuesday, December 14, 2010

Christmas Candies

Two weeks ago my family had our Lynn Women First Annual Christmas Bake Off which we named "Lovin' From The Oven" :). It was soooo much fun! I made caramel popcorn (will post later!) and Christmas Candies. Unfortunately I forgot my camera for the event so my photos are a compilation of my family's phone photos and my iPhone photos.


I discovered these delicious little candies in Sandra Lee's Semi-Homemade Magazine. In the magazine is beautiful picture of the candy and a short (somewhat helpful) blurb on how to make them. But no worries friends, I have perfected the recipe just for you!

Tools Needed:
Baking Sheet
Parchment Paper (Don't use wax paper! It will burn in the oven!!!!)
The Usual
Heavy Plastic Baggie
Scissors

Ingredients:
Yogurt Covered Pretzels
Rolos
Pecans
White Chocolate*


Preheat the oven to 350 degrees. Line a baking sheet with parchment paper and arrange the yogurt covered pretzels (evenly spaced) on the baking sheet. As you can see from my picture I did not use parchment paper and I definitely wish I had. The candies came out just fine but parchment would have been a big help. Unwrap your Rolos and place one on each pretzel (in the middle of the pretzel) and place the baking sheet in the oven for 3 minuets.

Once you remove the baking sheet from the oven squish a pecan half into each Rolo like in the picture.

*Ok... so I had a few issues drizzling the icing over my creations. If you buy Ghirardelli white chocolate chips and melt them (How to melt chocolate) you cannot drizzle the chocolate. It is best to pour melted chocolate in to a heavy plastic bag and snip off a tiny piece of one corner so you can use it as a pastry bag. The chocolate will be hot so hold the plastic bag with a towel.
 If you buy melting chocolate you can drizzle the chocolate normally. Dip a spoon into the melted chocolate and let the first clumpy drip land in the pan. Drizzle chocolate over the edges and tops of candies.

I had so much fun making these pretty, delicious and surprisingly easy candies! Put your Christmas Candies into little goodies bags and give them away as gifts. As always ENJOY!

Sunday, November 14, 2010

Caramel Apples


It is definitely the caramel apple time of the year! Sigh... Fall how I love everything about you! You bring cooler weather, the best TV shows, Halloween, changing of the leaves, Thanksgiving, warm comfort food and of course football (BOOMER SOONER!!). These caramel apples were delicious and I hope you enjoy them too!

Tools Needed:
Craft sticks or popsicle sticks ( You can find craft sticks in your grocery store and popsicle sticks at Hobby Lobby, Michael's or (probably) a specialty food store)
Bowls for candy coating
Towel
Ladle
Spatula
Muffin paper cups

Ingredients:
12 - 15 Small apples (I used Granny Smiths because they are my favorite)
2 (14 ounce) package individually wrapped caramels
Toppings

Firsts things first... when you are buying apples no matter where they are from (orchard, organic or chain grocery) they will have wax on them. Apples naturally create their own wax to protect its high water content. You MUST remove this wax in order to get the caramel to stick to the apples.


To remove the wax from the apples dip them into boiling water using a ladle. Make sure to submerge the entire apple in the boiling water. Don't leave the apple in the water long (no more than 10 - 15 seconds).


Remove the apple from the boiling water and wipe off the wax immediately using a towel. You should be able to see the wax coming off. 


Remove the stem from each apple and press a craft stick into the top.


There are several ways to melt caramel. Check out this link and select the method you prefer. Roll each apple quickly in melted caramel sauce until well coated. A spatula might come in hand to spread out the caramel on the apple. Immediately dip and roll the apples in your toppings. I used peanuts and mini chocolate chips (Delicious!). Place the finished caramel apples in a muffin paper cup (because they look cute and keep your pans from getting sticky with caramel!).


There are so many topping choices: Nuts, Sprinkles, Toffee bits, Chocolate chips, Candy corn, Dried fruit, M&M's, chopped candy bars like Snickers, Butterfinger or Baby Ruth, Crushed Oreos or graham crackers, Granola, Trail mix and Kosher salt! What were the toppings on your favorite caramel apple?

Monday, October 25, 2010

Easy Apple Strudel!

My friend Nick at Home Brew Brewery loves to brew his own beer.  In celebration of Oktoberfest he brewed a special batch and threw a party! I brought some delicious (and super easy) Apple Strudel. I started with this recipe from All Recipes. Because the recipe only called for brown sugar to be mixed with the apples... I spiced it up a bit!

Ingredients:
2 - 3 Granny Smith apples
1 Cup brown sugar
1 1/2 Tablespoons cinnamon
2 1/4 Teaspoons nutmeg
1/4 Teaspoon cayenne pepper
1 Sheet frozen puff pastry, thawed
1 Egg
1/4 Cup milk

Tools Needed:
The Usual
Whisk
Baking Sheet
Baking Brush
Foil

Preheat oven to 400 degrees. Line a baking sheet with aluminum foil. Peel, core and slice up the apples and place them in a large bowl. I did what I like to call the "homemade peel" ...aka the lazy persons peel. I love the taste of apple peels and it's the healthiest part so I don't really see a reason to peel off all of the apple peel.


Stir the brown sugar, cinnamon, nutmeg and cayenne pepper into the apples.


 Place puff pastry flat on the baking sheet and arrange apple filling down the middle of the pastry lengthwise. You may not be able to fit all of the apple filling into the pastry. 


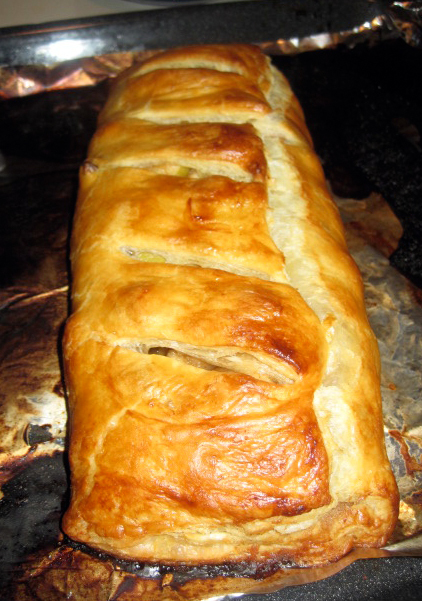
Fold the pastry lengthwise around the mixture. Seal edges of pastry by using a bit of water on your fingers, and rubbing the pastry edges together. Whisk egg and milk together, and brush onto top of pastry. Cut several slits into the pastry.


Bake in oven for 20 to 25 minutes, or until golden brown.


Here is a slice of the strudel with some of Nicks Oktoberfest home brew. I got a million compliments on the strudel at Nicks party. It is super easy and you will definitely enjoy it!

Thursday, October 7, 2010

New York!

So I think my blog is going to start heading in a new direction! As much as I love to bake... I LOVE FOOD MORE! If eating constantly didn't make me fat, I would... no joke. 


In saying that let me kind of layout how the rest of my posts are more or less going to go. From this point forward blog post subjects will be... 
  • Baking, Eating, Sharing
  • Cooking, Eating, Sharing
  • Eating and Sharing (by "Eating" I mean anything I eat that I deem to be good enough to write a blog about... I will write a blog about)
Alright! So last weekend I went to New York with my friend Jglav to visit my friend Kat. Kat is an assistant stylist to the style editor of the Today Show (cool job huh!?) and writes an awesome fashion blog at StellarPutTogethers.wordpress.com. Kat let Jglav and I stay at her place in Jersey City and spent the entire weekend showing us around. I took pictures of EVERY SINGLE THING I ate in New York!


Jglav and I arrived late Friday night and Kat immediately took us to Time square. Of course I got a street vendor hot dog! In my opinion it is not a trip to New York if you don't!
My dog came with everything (except for relish... I'm not a sweet pickle fan). 

The next morning we all walked from Kat's apartment to a local bagel shop call Wonder Bagels. I was blown away by the oj choices... no pulp, some pulp, apple and even orange peach mango! YUM!

Best bagels I have ever eaten... no joke!! I got the everything bagel with plain cream cheese and Kat got an everything bagel with egg whites, cheese and tomatoes. 

This is me... in bagel heaven. 

We could not resist some Dunkin Donuts! I had an iced coffee and the pumpkin harvest donut. Jglav had the sugar donut. 

After several hours of shopping and touring we took a rest for some Pinkberry ! I had chocolate yogurt with bananas, strawberries, mini chocolate chips and almond slivers. 

Starbucks iced coffee and shoes... need I say more?

Mmmmm... take home pad thai, pad co, hummus and carrots! I was too tired to pay attention to the name of the local joint we ordered this from.

A long Saturday night of bar hopping and dancing ended with this fabulous pepperoni, canadian bacon and pineapple pizza slice from Famous Original Ray's Pizza. 

Another Wonder Bagel breakfast... this time I had an everything bagel with egg whites, cheese, tomatoes and avocado (we added the avocado ourselves). 

Did you know that coconut water is a great hang over cure?! Everyone drinks it in New York and it worked for me... read about its effects here!

Yep... why just try one donut when you can sample a variety!

After another long day touring we stopped at a sushi joint called Sushiya. Kat and I split the grilled salmon roll. It had grilled salmon, avocado, MANGO and red pepper. Fabulous! 

Street vendor crepe of strawberries, bananas and (of course) Nutella!

More Starbucks iced coffee... obviously sleep was not a high priority on this trip. 

And on the last day we had Wonder Bagels again (at this point we were addicted). I ventured out and got green chive cream cheese (as if an everything bagel didn't make my breath bad enough!).

Over all I had an absolutely wonderful time... we did so much shopping (H&M, Urban Outfitters, Top Shop) and I got to see my favorite painting, Starry Night, at MOMA.  I cannot wait to return... possibly this summer! A BIG THANKS goes out to Kat for being a wonderful hostess! Love ya twin!

Wednesday, September 29, 2010

Big Top Cupcake Cake!

Some time ago I purchased a Big Top Cupcake Silicone Bakeware kit... very cute and looked like a fun and easy time. I don't usually make cake because I'm honestly not a big fan of it. I really don't remember the last time I got a Birthday cake... I always have cookie cake and Mrs Fields makes the best cookie cakes! I worked there forever ago (aka High School).

This was my second attempt at making a cupcake cake. I say attempt because both times have not turned out entirely as planned. The first attempt was quite a blunder but I'm saving those pics for a blog post dedicated to all of my baking blunders (well at least the ones I have taken pictures of). I was not sure if the blunders were due to the bakeware or myself. After reading a few reviews of the product I think the baking instructions that come with the Big Top Cupcake need some work (Review 1, Review 2, Review 3).  Either way the cake and icing tasted awesome!

Tools Needed:
The Usual
Big Top Cupcake
Pam cooking spray
Cookie sheet
Stand or handheld mixer 

Ingredients:
1 Box of chocolate cake mix (I prefer Betty Crocker)
11/3 Cups water
1/2 Cup vegetable oil (I don't use olive oil... it changes the taste.)
3 Eggs


Preheat the oven to 350 degrees. If you have been reading my blog since the beginning then you know that I don't make cake... I buy a box. What you can make at home is just as good if not better then what you can buy in a box! That being said prepare the cake batter according to the directions on the box. I suggest buying Betty Crocker Super Moist. 


Spray the molds with Pam and place them on a cookie sheet. The Big Top instructions say to poor half the batter in each piece... I disagree.  I was using the filling top so pour 2 1/2 to 3/4 cups of the batter into the bottom mold and the remaining 11/2 to 11/4 cups into the top mold.


Place the filling top securely on top of the bottom cupcake piece.
The directions say to bake the top for 30 to 35 minutes and the bottom for 45 to 50 minutes... again I disagree. It actuality takes more than an hour to fully cook the cake. Check the cake top in 45 min by sticking a knife or tooth pick into it. If the knife or tooth pick comes out clean then the cake is done. Check the cake bottom for doneness in an hour. Continue baking until tooth pick or knife come out clean. 


The cake filler has never been much of a help but I use it anyway... Once the cake is done carefully scoop out some of the center. This is kind of difficult and frustrating because the bottom piece cracks the cake and scooping out more of the cake can crack it further so... BE CAREFUL! 


Fill the center and cover the top of the bottom piece with icing (use the icing to mold together any cracks). I used Martha Stewards Sprinkles Strawberry Frosting Recipe and it tasted fantastic but you can use whatever frosting you like best!


Carefully place the top cupcake piece on the bottom cupcake piece and ice it!


Here is my Boomer Sooner Breast Cancer Awareness Cupcake Cake!


Despite the numerous baking problems... the cake and icing tasted awesome! Enjoy!